Normalization translates a raw log message into Logpoint taxonomy. Normalization Packages contain one or more normalizers to normalize raw log messages and Normalization Policies combine one or more normalization packages. You can create normalization policies by combining various normalization packages and compiled normalizers. We recommend you create different normalization policies for similar types of normalization packages.
For example, if you have an MS Windows 2008 server running MS-SQL 2005, then you can create a normalization policy consisting of the normalization packages for Windows 2008 and MS-SQL 2005 and apply this policy to the server.

Normalization Policies
To sort the columns in ascending or descending order, move your cursor to the column you want to sort. You will see a down arrow; click it and select Sort Ascending or Sort Descending.

Sorting Columns
To filter the columns you want in the UI, click the MORE dropdown, click Columns, and select the columns you want.

While creating a normalization policy, you can select the Compiled Normalizers as well as the regex-based normalization packages.
If a normalization policy contains both types of normalizers, Logpoint first uses the compiled normalizers to normalize an incoming log. The regex-based normalizers are used only if all of the compiled normalizers fail to normalize it. The normalization packages are prioritized by the order you provide while creating the normalization policy. The compiled normalizers are available as plugins.
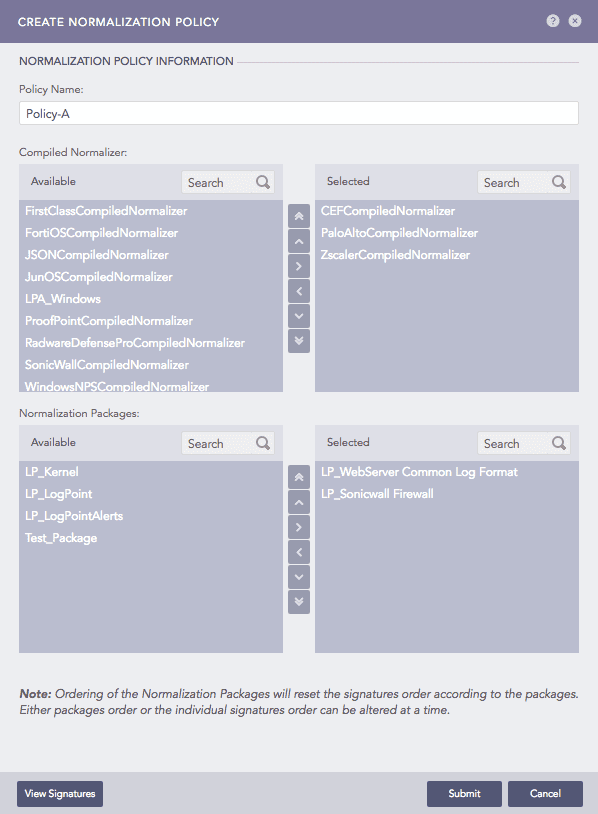
Create Normalization Policy
For the normalization policy in the example above, Logpoint first tries to normalize an incoming log using the CEFCompiledNormalizer. If the normalization fails, it tries to get it normalized using the PaloAltoCompiledNormalizer and then the ZscalerCompiledNormalizer. If the normalization is still not successful, Logpoint finally uses the LP_WebServer Common Log Format and then the LP_Sonicwall Firewall.
Go to Settings >> Configuration from the navigation bar and click Normalization Policies.
Click ADD.
Create Normalization Policy
Enter a Policy Name.
Select the available Normalization Packages and Compiled Normalizers that you want to use in the policy. You can do this by:
Double-clicking the packages.
Dragging and dropping the packages from the left pane to the right.
Selecting a package and clicking the > button.
You can click the View Signatures button at the bottom-left corner to view all the signatures in the selected packages.
Click Submit.
Click the ? symbol near the top-right corner for context-sensitive help.
You cannot edit the name of a normalization policy.
Go to Settings >> Configuration from the navigation bar and click Normalization Policies.
Click the Name of the required normalization policy and update the information.
Click Submit.
Go to Settings >> Configuration from the navigation bar and click Normalization Policies.
Click the Delete icon under Actions.
To delete multiple normalization policies, select the policies. Click MORE and choose Delete Selected.
To delete all the normalization policies, click MORE and choose Delete All.

Deleting Normalization Policies
Click Yes.